Systematic Instruction
Imagine trying to learn how to bake a cake, but the recipe is all jumbled up. Step 4 is listed before step 1, and step 2 is written in invisible ink. Pretty much impossible. Well, that’s what learning can feel like without a plan. That’s why systematic instruction is so important. Especially in special education. Systematic Instruction is like a clear recipe for teaching, with every step in the right order.
When teaching is organized the students can learn better and you will feel more in control of your instructional leadership. Teaching kids with special needs requires you to have a strategy. One of the most effective and widely used strategies in special education is systematic instruction. This approach helps students learn by breaking down skills into smaller parts and teaching them step by step. The goal is to be clear and specific.
What Is Systematic Instruction?
Systematic instruction is a teaching style where instruction is planned out in clear, easy-to-follow steps. With this approach, you are using intentional methods to help students understand and remember what they’re learning. This is a much needed style of teaching for students in self-contained classrooms. Here is how to start.
1. Start with Explicit Instruction.
Know exactly what you are going to teach and how you are going to teach a skill. Be very direct and intentional about what you are teaching. Use explicit and systematic instruction. Here is an example of explicit instruction.
2. Break Tasks Down to Sequence Instruction
- Understanding the Concept of Scaffolding
You have heard of scaffolding before but we are not talking about that kind of scaffolding. No large construction structures here. Scaffolding in teaching means you break down tasks into manageable segments, and then build on more information at a later time. The scaffolding teaching strategy is useful because it provides a structured and supportive framework by allowing students to grasp complex concepts, starting with basic foundational elements. Then, progressively learning more and more a little at a time until they reach mastery.
- Presenting One Item or Skill at a Time
We know scaffolding in education settings is the concept that helps skills to build on one another. Another strategy works well too. The strategy of presenting one item or skill at a time is a powerful approach. For example, if you are teaching a student with significant cognitive challenges numbers 1-10, but they are not grasping, you may just focus on number 1 for a while. By isolating and introducing individual skills, you can create focused learning where students can concentrate on mastering one aspect before moving on to the next. This strategy enhances comprehension, minimizes overwhelm, and fosters a step-by-step learning process that you can control.
- Starting with the Smallest Part and Building Gradually
Another strategy for breaking down tasks for students with autism involves the approach of starting with the smallest part and building gradually. As a teacher, you want to be able to explain that you have a plan to get the student to the goal. However, if you always start with the big picture, the student may get frustrated and not get to the goal. Be ok with starting small and building a little at a time. Just have a plan and be intentional about it. The hope is that students can gain confidence, experience success, and gradually tackle more difficult concepts as they build proficiency.
3. Try Modeling
When we model, we are helping students to see an example of what we want. This is especially needed for some of our students with autism who may struggle with sequencing. To model, you want to show students what to do. Be sure to perform each step slowly and clearly (ex. “Do this like this, now you try”) and then give them a chance to give it a try.
4. Use Prompting as a Support
Now let’s talk about a secret weapon special educators use called prompting. It’s kind of like giving clues when someone is stuck. Prompts help students learn something new without doing the work for them.
In systematic instruction, a prompt hierarchy is a ranked order of prompts that goes from most to least intrusive (or the other direction). With the goal of having a student become independent in doing the skill.
Types of Prompt Hierarchies:
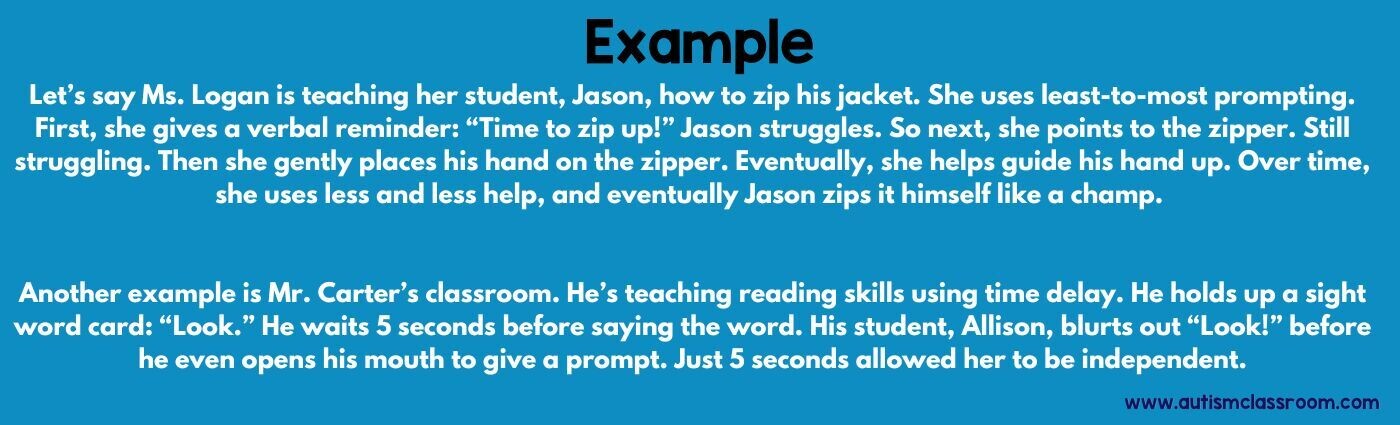
- Most-to-Least Prompting – For example, a teacher might start with physical guidance and gradually shift to verbal or visual cues. This would be Most-to-Least Prompting. You start with full support, then fade your support.
- Least-to-Most prompting - If you have a situation where you want to give the student a chance to get it right, but you notice they need help, you may possibly use Least-to-Most Prompting where you start with minimal help and then add more if needed. Here is an example.
- Graduated Guidance - Finally, if you are teaching a (physical) motor task you may be providing physical assistance but then notice that the student can perform some of the task on their own, so you back off. However, at a certain point they need help again and you help them again. That is called Graduated Guidance. You are providing prompts in real time, based on their needs at the time.
Prompt Systems
A prompt system, on the other hand, is the entire strategy for delivering and fading prompts. This includes your chosen hierarchy, timing and criteria for reducing support. Although the hierarchy focuses on types of prompts, the system is a strategy to make sure the prompts are used in a specific way.
Types of Prompt Systems:
- Time Delay – With time delay, you are going to wait a few seconds before jumping in to help. Sometimes all a student needs is a moment to think. You just have to train yourself and your staff to give “wait time.”
- Systematic Fading – This will be when you give less help each time so that students can do more on their own. You plan when (at what point or criteria level) you will eliminate some of your prompts.
- Simultaneous Prompting: With simultaneous prompting, the prompt is always given immediately and not faded during instruction. You are helping them get it correct immediately after you give the instruction with this system.
5. Practice Guided and Independent Practice
We probably do this anyway without giving it a label. But when we guide the students first, then give them a chance to work on their own, we are using systematic instruction.
6. Give Frequent Feedback
Giving immediate, specific feedback is key to reinforcing learning. Our students need to know fairly quickly if the answer was correct. They also need to know pretty often. Unless it is an assessment, rather than waiting until the end of a set of trials, you may want to give immediate and specific feedback at the end of just one trial. This helps students know what is correct and what is not. (Note: If you are giving an assessment, you might not use this technique.)
7. Maintain Progress Monitoring
Student performance has to be tracked regularly to effectively guide instruction. As we well know as special education teachers, progress monitoring keeps instruction on track. By regularly assessing student performance, we can identify if a student is mastering a goal or making progress toward the goal. This is essential to systematic instruction because we have to know if the work we are doing is working!
I understand what peopele say about the tedious nature of writing lesson plans, but it is just a fact, the best instruction starts with having a plan. Systematic instruction helps take the guesswork out of teaching. When things are clear and organized and systematic, you have a better chance of making an impact. Imagine trying to learn how to bake a cake now, but the recipe is clear and in order and you have all the ingredients. The goal of a cake is possible. You will be enjoying that food in no time. Just don’t leave it (in sight of your students) on your desk in the classroom while you walk across the room to answer the call button!