Inside: Ideas for using token boards, choice boards, visual directions and visual timers for autism support classrooms.
Visual Supports
You said it. You even said it again. So why are they not doing what you said? Hummm. Maybe using visuals can help. Using visual supports in your classroom is number one when working with students who need a little extra language support, especially students with autism. Can you imagine yourself guiding a student through an activity, and instead of repeating instructions over and over, you've got clear, step-by-step visual cues right there to help them out? That is where token boards, choice boards, visual directions and visual timers for autism support environments come in. Sound like a dream? I know, right?
Visual Directions
Let’s start with directions. Visual directions break down tasks into manageable steps, pairing each step with a picture or drawing that shows exactly what needs to be done. The key here is to match the activity and the number of steps to the student’s abilities, making sure it's not overwhelming. For students with autism, using photographs or picture icons for each step can make the directions clearer and more relatable.

But why use visual directions for special needs students? The rationale is pretty simple.
- Visuals provide clear, concrete representations of instructions and reduce confusion and frustration.
- Students can refer back to the instructions when they need to if it is visual.
- They make the learning environment more predictable and help students know what’s coming next.
- They can increase students’ abilities to follow routines and do tasks without constant verbal reminders or assistance from the adult.
- Visual instructions help with auditory processing or language comprehension challenges.
- And the best I can think of…They support smoother transitions between activities or from one location to another.
You might be wondering how to present visual directions for special needs students. It’s a great question to have since there are so many options. Typically, you'll want to put them on a sheet of paper or card stock and laminate them for durability. You can even slide them into a sheet protector to keep them safe. If your student is working on building independence, you can take it a step further by attaching each picture with Velcro. This lets them physically sequence the steps – first with support and eventually all on their own. You will thank yourself later!

Make sure the visual directions are placed where they're most needed. You want them easily accessible, whether that's near the activity or in a communication binder that can be carried around. You will want to be setting your students up for success with the right tools in the right place!
Choice Boards
Do you have choice boards in your classroom? If so, get ready to use them! Giving students choices not only helps them feel more in control but can also reduce behaviors that often stem from frustration or a lack of communication. Plus, when students, especially those who are nonverbal or have limited verbal skills, can express their preferences through a choice board, it really gets them invested in the communication process. You can pull over that communication car, step out of the driver's seat and give them the keys to say, "Hey, this is what I want!"
By having choice boards for students with special needs available, you’re also empowering them. You're telling them, "Your voice matters, and you have control over what happens next." And believe me, that sense of control can go a long way in making students trust you and help them feel more comfortable and engaged. Just remember, the choices you give need to actually be available. Try not to offer things that aren’t on hand because that can lead to more frustration. Keep it realistic and simple!
When you are setting up your choice boards for students, it’s usually best to:
- Limit the number of choices, especially in the beginning. You don’t want to overwhelm your students with too many options.
- Start small and work your way up.
- When you’re making your choice board, laminating it is a must. Hello, durability!
- Use Velcro for the removable pieces to keep everything tidy and functional. This way, students can easily take off their option.
- Keep extra icons in a baggie or envelope.
- Swap out choices as needed.

Choice boards in the classroom are such an underused tool. They give your students a voice, build their independence, and can even help you target some language and communication goals. So, if you haven’t tried using one yet, now’s the time! Your students will thank you, and you’ll probably wonder how you ever managed without one. We have some in our sensory bin resource.
Visual Timers
You can also try timers. Visual timers can make your classroom run a little smoother than yesterday, especially if you have students with higher needs who might struggle with the concept of time. Time is super abstract, and for some students, it can be tough to grasp how long an activity should take or when something is about to end. That’s where visual timers come in. They work double duty since they provide visual and auditory cues to students.
There are all kinds of timers you can use. Some teachers swear by those visual timers where a red section of the timer shrinks as time runs out. It’s such a simple, effective way to show how much time is left, and it’s especially helpful for students who need that extra visual.

You could also go old school with a kitchen or egg timer that gives the familiar bell ring when time’s up. If you are like most teachers, you might prefer a digital timer that beeps. Just keep in mind, that while computer screen timers can be handy, they might be a bit too distracting for students who get hyper-focused on the computer itself.
How do you Incorporate Timers in the Classroom?
We all know how tricky transitions can be, right? Try timers for transitions. For students who struggle with moving from one activity to another, a timer can work wonders. Imagine your students are finishing up an independent task, and it’s almost time for circle time. By setting a timer a few minutes before the transition and giving them a heads-up as time winds down, you are preparing them for the change. This gentle reminder helps reduce anxiety and makes switching from one activity to another much smoother. Timers can help keep the day structured.

Timers are also perfect for managing work sessions and breaks. If you're in the middle of a 15-minute work period, using a visual timer shows students exactly how much time they have left. Afterward, the timer signals a 5-minute break, reinforcing the idea that "work comes first, but a break is coming." This balance keeps students focused during work time while giving them something to look forward to, creating a win-win situation for both you and your students.
Task completion can be another challenge for some students, especially when activities feel long or overwhelming. Timers help by breaking tasks down into smaller, bite-sized chunks. For instance, if you're doing a writing activity, you might set a timer for 10 minutes of writing, followed by a short break or a different task. This keeps things structured and manageable, preventing students from feeling swamped by a long, open-ended activity.
Some days you can use timers to let students know when a break is completed. For example, we have created a series of timed sensory videos for classrooms on our YouTube Channel. The videos have a set amount of time (3 minutes, 6 minutes, 7 minutes, etc.) so that as a teacher, you have a built in timer. When the video goes off, you know the alloted time has passed. 
Consider some behavior support benefits as well. If a student struggles to stay calm during group work or sensory play, setting a timer gives them a clear endpoint. Knowing that an activity will only last for a set amount of time helps reduce anxiety for some students.
A final way to incorporate them would be to increase self-awareness.Timers are also a fantastic tool for building independence in your classroom. For students working on self-regulation, you can set a timer for calming breaks. When the timer goes off, the student knows it’s time to return to the group or move on to the next task. You just pull the timer out, set the amount of time you need, and (hopefully) watch them develop time management skills and gain more control over their behavior. It would be so fantastic if you could promote independence without giving constant reminders.
A few quick tips to keep in mind when using timers:
- Be strategic about when you use them. Are they for transitions, activities, or breaks? Pick moments where they’ll really help keep things on track.
- Let students know how much time they have. Whether it's 10 minutes or 2, let them know what’s on the timer so they can mentally prepare.
- Give a heads-up when the time is almost up. A one or two-minute warning can be a lifesaver for students who need that extra prep to transition smoothly.
- Stick to the schedule. Timers can help you keep everything running on time, so once you’ve set it, try to honor that timeframe.
Token Board
It almost feels like there is so much to make in order to support your students, right? But if you think about it, one weekend of creating might save you days and weeks of hectic moments. So, let’s look at one other method that can be in your toolbox of strategies…Token boards in an autism classroom!
Just figure out what favorite character you’re going to use (if you want to add one to the token board), get your laminator ready, and watch this become one of your go-to strategies. But how do you use token boards in an autism classroom? We want you to create token boards that an autism support classroom will actually use.
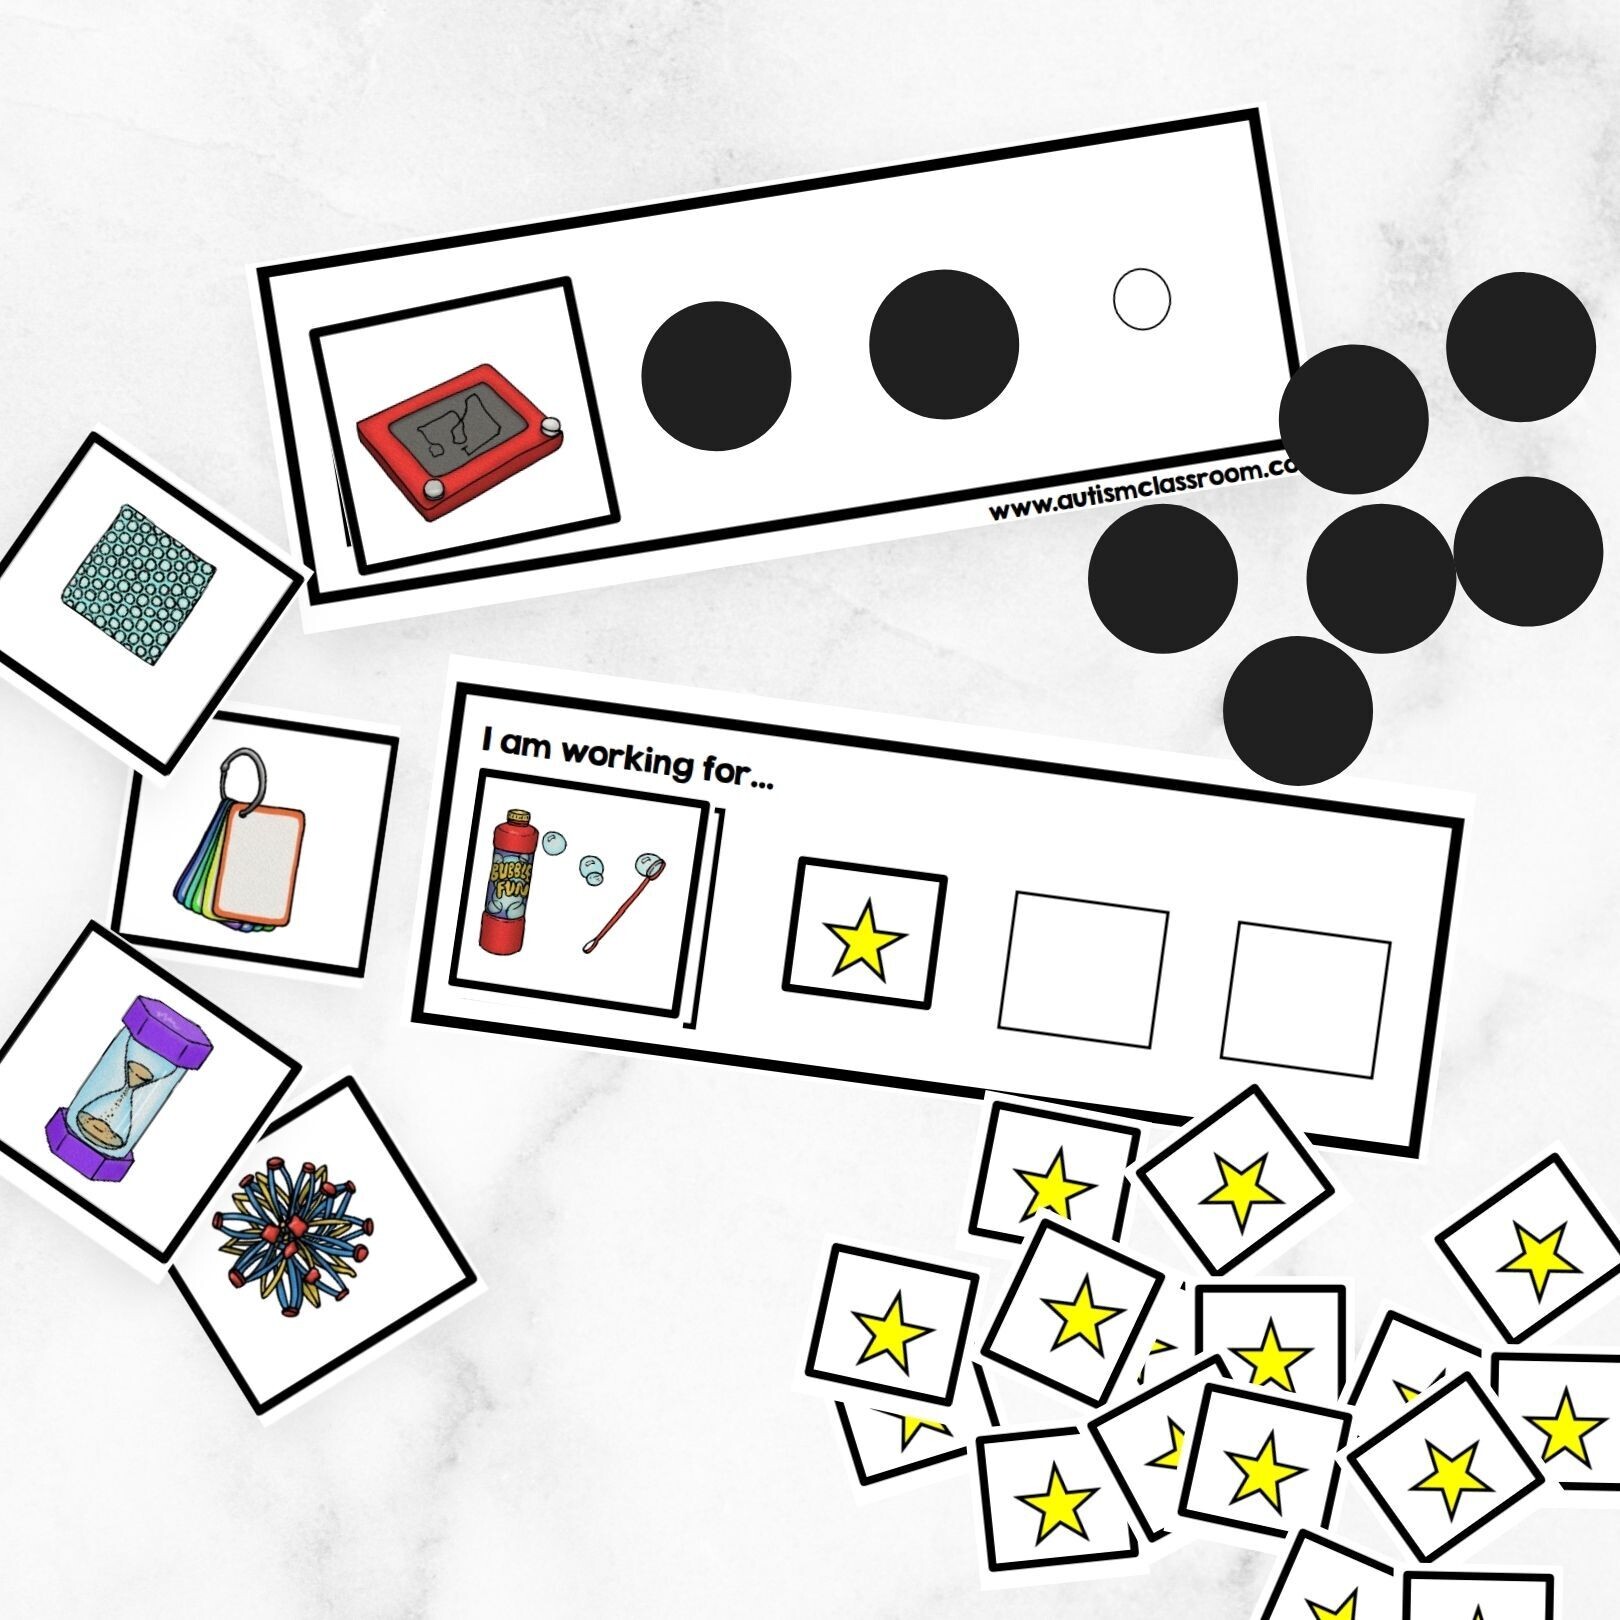
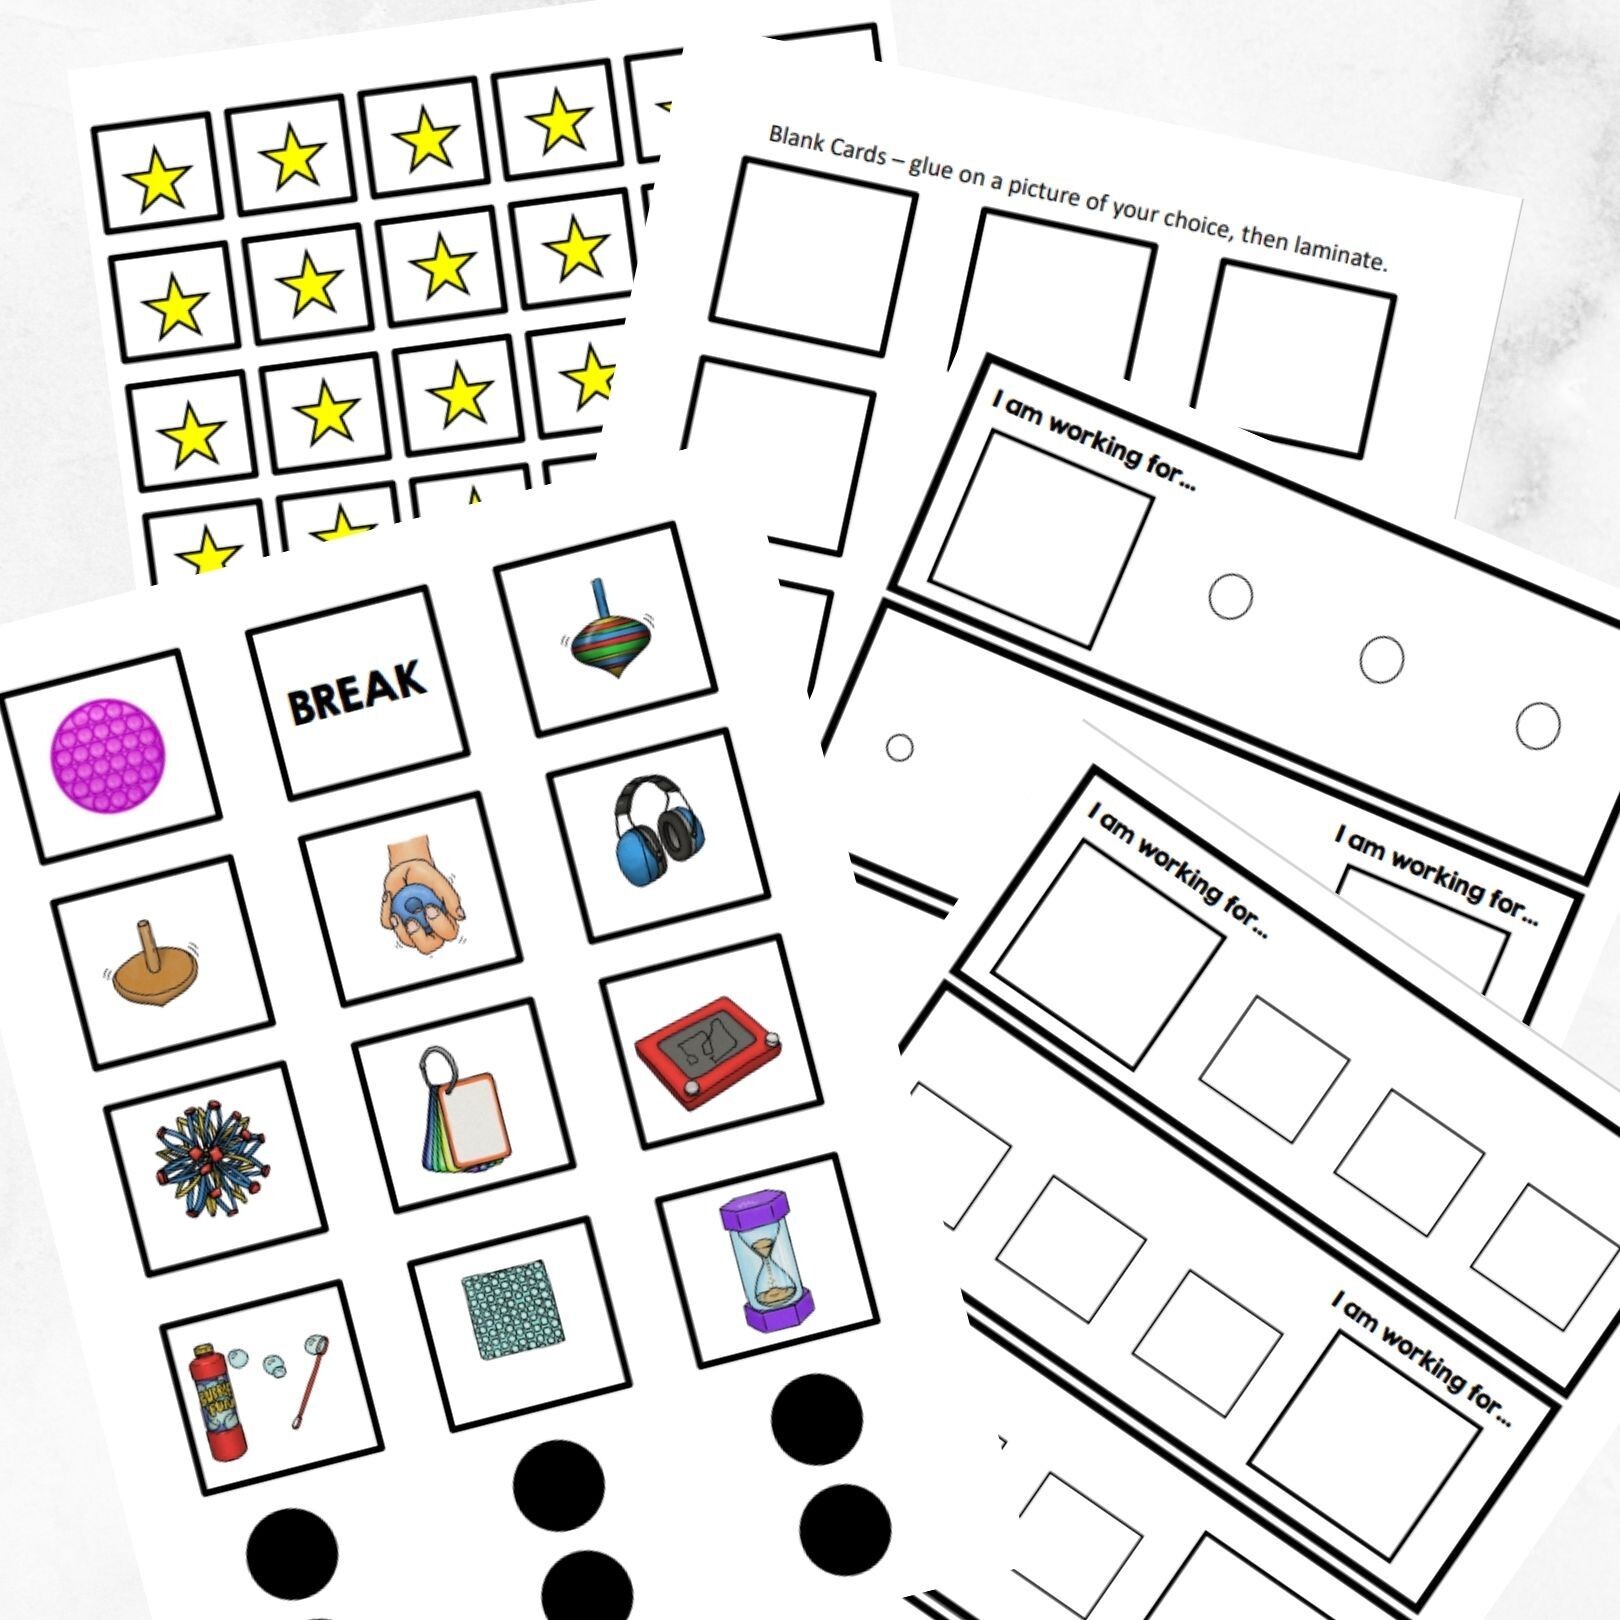
- First, you’ll want to choose a board. You can either create your own or grab one that's already made. (See our token board resource in the picture below.) Typically, boards with 3 to 5 tokens work best, but feel free to customize it to fit your classroom needs!
- Next, set up the board! Make sure to laminate it for durability, cut out any excess paper, and add some Velcro. This will make it easy to stick the tokens on the token board and take them off when you need to. Trust me, this little bit of prep work goes a long way! Now, let’s make your life easier. Consider adding Velcro to the back of the tokens to keep them organized when not in use. This little trick will save you time and keep your classroom tidy!
- At this point, you’ll need to make picture icons for the rewards. Choose something easy to deliver—think stickers, extra playtime, or a fun activity. The key here is to pick rewards that your students will be excited about, so they stay motivated to earn those tokens!
4. Now, let’s talk about how to teach the system. Make sure your students understand how the token board works. And here’s a crucial tip: never take away tokens once they’ve been earned. This helps build trust and keeps the focus on reinforcing positive behavior rather than punishing negative behavior.
5. Finally, have them earn the tokens, and after the number has been hit, give the reward for a few minutes, but do not give the reward for too long. Don’t forget… Do not give a reward that is too large to consume quickly. A quick chance to engage in the activity or item is all that is needed.
You can also increase the number of tokens required as they improve, building their stamina for positive behaviors. And remember, think about adjusting as needed. We have some token boards here if you want to see. If something isn’t working, feel free to tweak it. There you have it... you have the info to make token boards that autism support classrooms NEED!

So, if you haven’t tried some of these visuals yet, now’s the time. Let’s face it, nobody is going to thank you, but… hopefully, it puts an end to repeated requests or giving directions over and over again. You can thank yourself with less stress and more successful days!